- Hardware: A computer connected to a projector.
Optionally: A touch sensitive screen such as a SmartBoard for user input, such as our BigBoard. - Software: You don't need any!
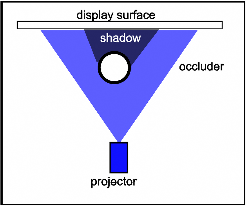
- What it does: Shows the display on a wall or other display surface. Note that a normal commodity projector needs to be located very close to the to the axis of the wall to produce a rectified image. If users attempt to interact with the computer display, their shadow covers the area directly in front of them, leading to coping behaviors as they attempt to move their shadow out of the way.
- Hardware: Computer with a minimum of one VGA port attached to a projector. Ideally, you will have two screens, one for a monitor, and the second attached to a projector. You can do this with most modern laptops that support a secondary screen on the external VGA out port.
- Software: We recommend using the pre-built WinPVRP application to get your feet wet, but this does require a minimum of two screens. If you only have a single monitor, you should look at the Trolley Timer application (in the trolley sub-directory of the procams toolkit) as an example application.
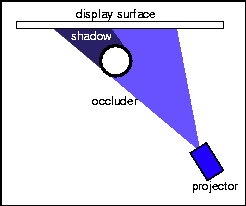
- What it does: By using your mouse, you can specify a quadrilateral within the projector's area of throw where the final image will appear. Essentially this is a "super-keystoning" effect done using the 3D graphics accelerator on the computer instead of inside the projector. This allows more freedom in projector placement. The "off-axis" projection also moves users shadows away from their working volume (directly in front of them).
- Hardware: Computer with a minimum of two screens attached
to two projectors. Preferably, a computer with three screens (a
dual-monitor graphics card attached to two projectors, plus an additional graphics card for a monitor). We use nVidia graphics cards, but any card
that supports DirectX 9 should work.
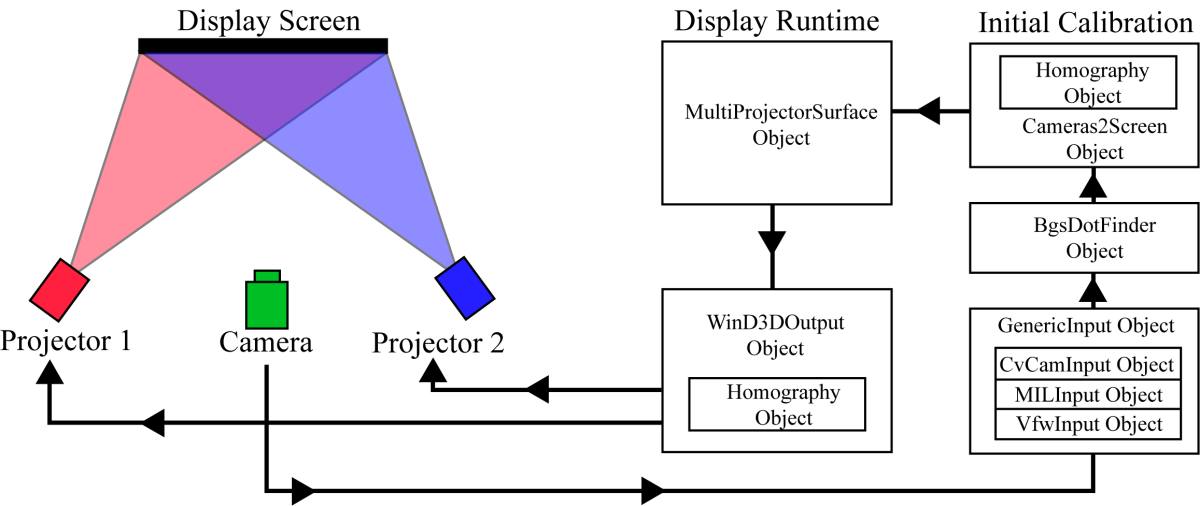
Optionally: a web-cam (or NTSC capture card w/ camera) that supports video-for-windows interface (most do). You can set up a PVRP display without one, but then you have to align the two projectors manually, which takes quite a bit longer. - Software: Once again, we recommend using the pre-built WinPVRP application. When it detects three screens, it will attempt to calibrate projectors on screens 2 and 3 using the web-cam. After the projectors are calibrated, the user (that's you) uses the mouse to specify the quadrilateral where the image should appear, and then the WinPVRP application takes screenshots from screen 1, and projects them onto the display surface from each of the projectors.
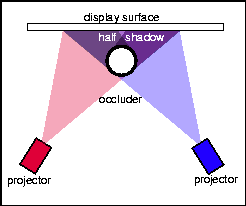
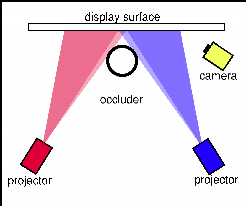
- What it does: By using two overlapped projectors, a PVRP display allows users to approach the display surface and interact with it while only casting "half-shadows". This results in a display that is robust to occlusions.
- More information: For an example PVRP application using only two screens, look at the "Wack-an-Advisor" demo we built. By sending images directly to the projectors (and avoiding the overhead of windows screen capture) the update rate is limited only by the speed of the projectors (most operate at 60Hz, but we have seen newer LCOS projectors that operate at 85Hz).
- Hardware: Although it helps to have multiple screens and projectors, you can compile and work with the code on any computer that supports MS Visual Studio. (We use version 6, but will soon be upgrading to .NET)
- Software: In addition to the GVU-PROCAMS source code, you will need MS Visual Studio, MS DirectX SDK, OpenCV, and the Intel IPL. See the Download page for links to each software package.
- Support: Read our ACM Multimedia paper to get an overview for the classes and abstractions in the GVU-PROCAMS toolkit. Read the readme.txt file in each of the distributions to learn about the individual project directories. Join the Mailing List, or email Jay directly for more help.
The source code that we distribute on the web is usually about a year behind the "state-of-the-art". This is not because we are guarding secrets, but because much of our research code just isn't ready for prime-time yet. It has bugs, and needs people who are intimately familiar with it to make things work.
For example, we have not yet released the code needed to build an
Active Virtual Rear Projected Display. An AVRP display uses an
IR-camera to detect occluders -- such as people standing in front of a
projector -- and turns off the portions of the projector they are
blocking so that annoying graphics are not displayed on their body,
and blinding light is not shot into their eyes. A secondary projector
is then used to fill in the shadow on the wall, providing a display
that is robust in the face of occlusions.
To see an example, watch some of the videos on the VRP
page.
If you would like help
setting up the hardware and software needed to create a similar
display for your research lab, please contact Jay. We will be happy to
advise you in replicating our hardware and provide a snapshot of our
current code-base.