This document describes the steps required to connect a MessagePad to the network, either directly or through a serial cable to the machine running the server.
![]()
This section covers connecting the MessagePad to an AppleTalk network using a localTalk cable. A LocalTalk (RJ-11) to DIN-8 (round connector) converter must be used and plugged into the serial port on the MessagePad.
We have several localTalk access points around the CoC:
Once the MessagePad is physically conneted, no additional setup needs to be done on the unit.
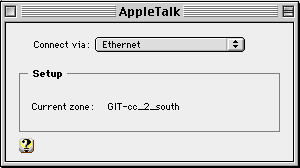
On the machine running the server, make sure that AppleTalk is configured correctly. This involves checking that the machine is speaking AppleTalk out of the correct port, which in the case of desktop machines is the Ethernet port, and is done via the AppleTalk Control Panel. Check with the network admin for the correct setting, but for any desktop machine around the CoC, it should be Ethernet. Make a note of the zone mentioned in the dialog, as that will be the zone that the server will appear in in the AppleTalk Chooser on the Newton.
![]()
This section covers connecting the MessagePad to an AppleTalk network using a combination of a NetWave Ethernet Tranceiver and a Dayna CommuniCard to offer wireless connection to the server.
First, plug the NetWave tranceiver into any Ethernet port which also has AppleTalk running over it (EtherTalk). Most (but not all) Ethernet outlets in the CoC also carry AppleTalk. The tranceiver is now setup, and you do not need to assign it a port address or any of that mumbo jumbo.
Second, make sure the application you want to run on the Newton is on the internal store (not the card) and insert the Dayna CommuniCard (don't forget to lock the card in place with the switch). When the card is locked in, a dialog saying that a communication card has been inserted appears to let you know. Next go to the "Roamer" package (which must be previously installed on that Newton from the floppy or beamed from another unit) and under the "Choose AppleTalk" popup, pick "Use EtherTalk." Close the Roamer package and the MessagePad is now ready (you can test that it works by trying to print something and locating a network printer).
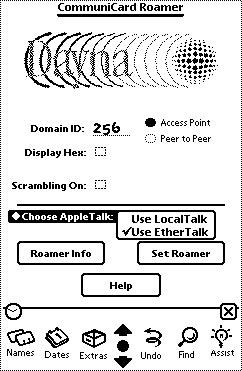
NOTE: You might have to reboot the Newton in order to get the wireless card to work.
On the machine running the server, make sure that AppleTalk is configured correctly. This involves checking that the machine is speaking AppleTalk out of the correct port, which in the case of desktop machines is the Ethernet port, and is done via the AppleTalk Control Panel. Check with the network admin for the correct setting, but for any desktop machine around the CoC, it should be Ethernet. Make a note of the zone mentioned in the dialog, as that will be the zone that the server will appear in in the AppleTalk Chooser on the MessagePad.
When you are done with the demo and before you remove the comminication card, return to the Roamer package and set the appletalk setting back to "Use AppleTalk." If you remove the card before you open the Roamer package, the package will refuse to load and the MesasgePad will be stuck using EtherTalk.
![]()
This section covers connecting the MessagePad directly to the machine on which the server is running via a serial cable. This is useful when you do not have an AppleTalk network around. Apple did a good thing by allowing anyone to easily make their own LAN just by cabling two Macintosh's together. This same concept can be used to create a LAN between the MessagePad and the Macintosh running the server.
First connect a normal Macintosh serial cable (with the round DIN-8 connectors on both ends) to the Modem port of the Macintosh which will be running the server. Connect the other end to the serial port on the MessagePad.
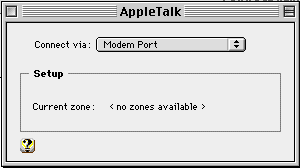
On the machine running the server, you now need to redirect AppleTalk to talk through the modem port (the normal setting around the CoC is the Ethernet port). Open the AppleTalk Control Panel and select "Modem port" from the "Connect via" pulldown menu. Close the control panel and click "Save" in the resulting dialog box.
What you have just done is created an AppleTalk network between the MessagePad and the Macintosh. For all intents and purposes, this is no longer a serial connection but a true AppleTalk connection. The desktop Macintosh still has full use of the Internet, as you have not affected where it speaks TCP/IP (which is most certainly the Ethernet port), but if you open the Chooser, you will notice that you can no longer see any printers or AppleShare servers.
When you are done with the demo, return the desktop machine's AppleTalk settings to the state you found it in before you changed it (most likely Ethernet) as shown below.
![]()