
A visual program is a collection of interconnected tools that acts upon one or more inputs to create one or more outputs (for example, an image). You derive program inputs from the output of tools in the program, or by setting the input values to constants. Tools that provide output values as input to other tools are (in alphabetical order):
Before building a visual program, you should be familiar with the information presented in this chapter as well as the information on Data Explorer modules presented in Chapter 1. "Data Explorer Tools" in IBM Visualization Data Explorer Programmer's Reference.
Chapter 2. "Tutorial I: Using Data Explorer" in IBM Visualization Data Explorer QuickStart Guide introduces the Data Explorer graphical user interface. Chapter 3. "Tutorial II: Editing and Creating Visual Programs" in IBM Visualization Data Explorer QuickStart Guide introduces the basic aspects of working with visual programs. These tutorials will familiarize you with the user interface as well as some of the commonly used Data Explorer modules.
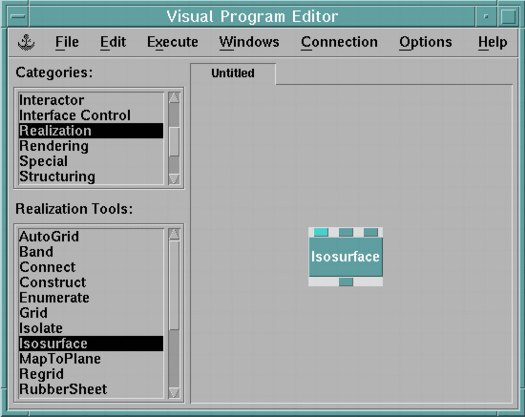
To create a visual program, use the Visual Program Editor (VPE) window, in which you place and connect tools and specify values for those tools. Figure 47 illustrates the VPE window and a sample visual program.
The title bar of the VPE displays the name of the current visual program file. On the left side of the window are two palettes. The top palette contains tool categories. When you select a category from the top palette, the bottom palette displays the tool names in that category. The large area on the right side of the window is called the canvas. You place tools on the canvas to construct a visual program.
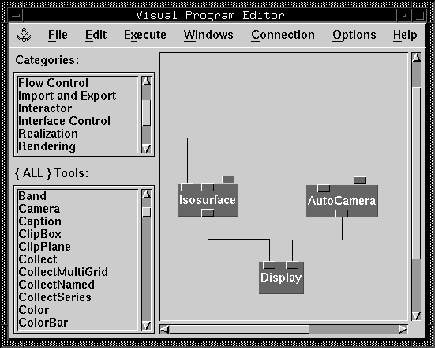
In some cases, the visual program may be too large to be displayed all at once on the canvas. On the right and bottom sides of the canvas are scroll bars, which allow you to move the display to different parts of the visual program. To display a different part of the visual program, click on the arrows at the end of the scroll bars, or click and hold the button on the bar between the arrows and move it until the desired portion of the visual program is displayed. Scroll bars may also appear in the tool palettes, if the list of categories or tools are too long to fit.
When you place a tool onto the canvas, it is represented by an icon. Figure 48 illustrates an example of a tool icon.
Figure 48. Example of a
Tool Icon
The tool icon, which has a highlighted border when selected, consists of a rectangle displaying the name of the tool, plus one or more tabs on the top, the bottom, or the top and the bottom of the rectangle. The rectangle is the active area and is used for selecting and moving the tool. The tabs on the top represent inputs to the tool, and the tabs on the bottom represent outputs. It is possible for a tool to have either no inputs or no outputs. Some of a tool's input tabs may be hidden (i.e., not displayed). It is possible to reveal the hidden tabs or hide additional tabs. It is also possible to add or remove input tabs for tools that allow a variable number of inputs. On many tools, one or more of the inputs are highlighted with a different color, indicating that the input is required. These tabs are discussed in more detail in "Specifying Values for a Tool's Inputs".
The basic steps in creating a visual program are:
To place one instance of the selected tool on the canvas:
| Note: | After you place a tool, its icon stays selected until you place
another tool, or deselect the tool as described in "Selecting,
Moving, and Deleting Tool Icons".
If you place one tool icon on top of another, the bottom tool icon is pushed to the right to allow room for the new one. To avoid the displacement of tool icons, allow enough space for each tool icon you plan to use. |
To deselect a tool name in the lower palette, do one of the following:
To select a tool icon, click on it.
To select a group of tool icons, use one of these methods:
| Note: | If you have tools selected already and you want to select more, hold down the Shift key and either click on a single icon, or drag the selection box over several icons to select them. To select all icons on the canvas, use the Select All option of the Edit pull-down menu. |
To deselect an icon, shift-click on it.
To deselect a group of tools, use one of these methods:
| Note: | Clicking on an empty part of the canvas deselects all selected tools. |
To move a tool icon:
To move a group of tool icons:
To provide the values of a given input for a tool, use one of these methods:
When you specify an input value for a tool, the corresponding tab on the tool's icon automatically folds in. If you do not specify an input value, the input tab remains folded out, indicating that the input is unbound and the tool uses its default for that input. The default values are given in the Configuration dialog box. The tabs that are folded in give you a visual representation of the inputs that have user-specified values. Some tabs require an input; those tabs remain highlighted in a different color until you specify an input with a connection or through a Configuration dialog box. Some of the tabs are not displayed, termed hidden. The hidden tabs can be revealed or additional tabs can be hidden (see "Revealing and Hiding Input Tabs"). Also, some tools allow you to add or remove input tabs (see "Adding and Removing Input and Output Tabs"). Figure 49 illustrates tools whose inputs have been specified.
Figure 49. How Tabs
Work. An input tab folds in when its input is supplied through a
connecting "arc" or is defined in the module's configuration dialog box.
When the default input is used, the tab remains up. An output tab folds in when
it is connected to another module by an arc.
A tab that is folded in but has no connecting line leading to it indicates that its input was specified using the tool's Configuration dialog box.
| Note: | You can also connect tabs by starting at the input tab. Simply press and hold the mouse button on the desired input tab; this causes the cursor to change to an upward pointing arrow. Drag the cursor to the desired output tab. When the cursor enters the area encompassing a tool icon, the output tabs that are compatible with the input tab will change color. |
When you release the mouse button, the white temporary line is replaced with a black line, and the corresponding tabs fold in.
| Note: | Sometimes, when tools are placed too close together on the canvas, a connection that you made is not visible. In this case, the affected input tabs are still folded in, and a dark line is visible on each one, but the connecting line is not visible. To correct this, move one of the affected tools to another spot on the canvas. |
You can connect an output tab to more than one input tab (either on different tool icons or on the same tool icon). Therefore, you can make a connection from an output tab even though the output tab is folded in.
An input tab can receive a value from only one source, either from a connection to an output tab or from a value entered in a Configuration dialog box. Once an input tab folds in, you cannot make a new connection to the tab until the tab is released.
Because output tabs can have multiple destinations, connections can only be moved or deleted from an input tab.
The Drag and Drop capability provided by Data Explorer allows you to move or copy selected tools within a Data Explorer window (e.g., the VPE or a control panel) or between different Data Explorer windows (i.e., between two different VPE windows). You can also drag interactor stand-ins to control panels to create interactors.
To initiate a drag and drop, first select the tools you want to move or copy, either by rubber-band or shift selection. Then place the mouse cursor over one of the selected tools and press the middle mouse button. Keeping the button pressed, move the cursor to an empty spot on the canvas and release the button. A copy of the selected tool will be placed where the mouse button was released. To do a cut and drop (move), use Shift-middle mouse button.
When dragging and dropping tools from the VPE, you may drop the tools on a VPE in another Data Explorer session or in another VPE (i.e., macro editor) of the same Data Explorer session. Interactors in control panels can only be dragged and dropped between panels in the same visual program.
If you drag a set of tools to an inappropriate window (e.g., from a control panel to a VPE), no action will occur. If you drag a set of tools that includes transmitters, the latter (along with their corresponding receivers) will be renamed to wireless-1, wireless-2, and so on.
Note: To include an existing .net file in the VPE, use the Insert Visual Program option of the Edit pull-down menu in the VPE. The inserted visual program is placed to the right of the rightmost tool in the existing network.
It is possible to create large visual programs in Data Explorer. Data Explorer provides two tools, Transmitter and Receiver, to maintain the modularity and readability of large programs. These tools allow connections between input and output tabs without using a visible connecting line. Using the Transmitter and Receiver tools allows you to separate visual programs into logical blocks. For example, the output of several logical blocks can be transmitted to another block that receives them, collects them, and produces the image. Macros, described in 7.2 , "Creating and Using Macros", provide another way to structure visual programs into logical blocks.
To remotely connect input and output tabs:
The Receiver automatically assumes the same name as the Transmitter. There can be multiple instances of a Receiver corresponding to a single Transmitter. These Receivers assume the same name until a new Transmitter is selected.
The name of a Transmitter and Receiver can be changed using the notation field of the Configuration dialog box (as described in "Entering Values in a Configuration Dialog Box"). When you change the name of the Transmitter, all Receivers that share a name with that Transmitter also change their names. However, when you change the name of a particular Receiver, the associated Transmitter and the other Receivers are not affected.
Most of the tools have a fixed number of inputs and outputs, but some, such as Collect and Compute, allow the number of inputs to vary. For example, the default number of inputs for Compute is two, but you may want to use the output from an expression that has six inputs. Data Explorer lets you change such tools to accommodate the extra inputs.
To add input tabs to a tool on the canvas:
| Note: | If the tool you selected has a fixed number of inputs, the Add Input Tab option is grayed out. |
The appropriate number of input tabs are added to the tool icon. Typically, the Add Input Tab option adds one tab to the icon. In the case of some tools, such as CollectNamed, that require inputs in pairs, two input tabs are added. To add multiple tabs, repeat the previous steps.
When you change the number of input tabs on the tool icon, the tool's Configuration dialog box is updated to reflect the change.
To remove input tabs from a tool on the canvas:
| Note: | If the tool you selected has a fixed number of inputs, or if the icon has only the minimum number of tabs required for that tool, the Remove Input Tab option is grayed out. |
The appropriate number of input tabs are removed from the right-side tool icon. If the tabs that are removed previously had connections to them, those connections are broken. It is possible for some tools to have zero input tabs. For example, you may want the Compute module to contain only an expression, with no inputs. The output would be the result of the expression.
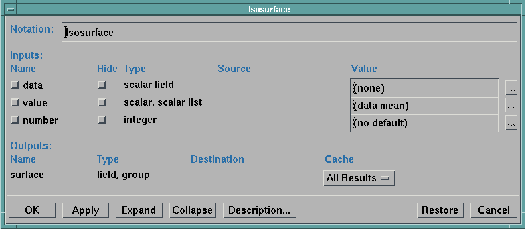
The Configuration dialog box displays the current state of a tool's inputs. You can modify the contents of the box directly. The contents are also automatically updated when changes in the visual program or in interactors in a Control Panel affect a tool's inputs. In general, specifying input values using the Configuration dialog box should be reserved for those values that remain constant during a visualization session. Use an interactor set in a Control Panel to specify values that are likely to be changed frequently.
This section describes a typical Configuration dialog box, illustrated in Figure 50. The Configuration dialog box for the Compute module, which is unlike the other Configuration dialog boxes, is described in "Using the Compute Module Configuration Dialog Box".
Figure 50. Typical
Configuration Dialog Box
You can open a Configuration dialog box in one of the following ways:
| Note: | If the tool icon is an interactor stand-in, a colormap editor stand-in, or an image tool, you must use the Edit menu Configuration option (or use the Ctrl+F accelerator key) to open the Configuration dialog box. |
A typical Configuration dialog box consists of four major parts:
The following sections describe the elements in a Configuration dialog box.
By default, the Notation field displays the name of the tool. You can use this field to enter a short notation about the use of the tool in the current visual program:
In the case of Transmitter, Receiver, Probe, ProbeList, and Pick tools, use the Notation field to rename the tool, thus changing the name appearing on the tool icon.
Toggle buttons | Specifies whether an input is active; that is, whether the input tab on the icon is folded in. The toggle buttons are the small square buttons on the far left of the dialog box. The toggle buttons provide a visual indication of the inputs that have been specified. These buttons are analogous to the input tabs on the tool icon and are coherent with the tabs: the buttons can be activated and deactivated by clicking on them.
|
Name | Specifies the name of an input parameter. You cannot modify this field. This field is grayed out if the name is specified with tab connections. |
Hide | Indicates whether an input tab is to be hidden. When you activate the Hide toggle button, the corresponding tab on the tool icon is removed. If a tab is connected to another tool it cannot be hidden. Once a tab is hidden, it can be removed from display in the Configuration dialog box by using the Collapse button. To reveal individual input tabs, first click on the Expand button. This will cause the Configuration dialog box to resize, displaying all of the tool's inputs. Then deactivate the Hide toggle buttons of the desired inputs by clicking on the toggle buttons. As the inputs are revealed, the tool icon is updated to reflect the additional inputs. Once you have revealed all the desired tabs, you can click on the Collapse button to remove the remaining hidden tabs from being displayed in the Configuration dialog box. See also "Revealing and Hiding Input Tabs". |
Type | Specifies the type of an input parameter. You cannot modify this field. |
Displays the name of the tool connected to the input, if a connection exists. If the name of a tool is displayed in the source field, the toggle button is activated and the name field is grayed out, and this input cannot be modified until the connecting line is deleted. | |
Value | You use the Value field to specify a value for an input. Initially the field contains the default value for an input. To modify the Value field, select the field by clicking on it. Then, edit it as a normal text field. The value must be specified in the syntax described in Chapter 10. "Data Explorer Scripting Language". After you change the field, do one of the following:
Data Explorer automatically adds the appropriate delimiters for the type of value entered. For instance, if you specified a string parameter in the Configuration dialog box, Data Explorer automatically adds the quotes around it. If you specified a scalar list, Data Explorer adds braces. |
... | This button, when enabled, brings up a list of possible values for the parameter. This list is for convenience only; you may enter values other than those listed as long as they are valid inputs for that parameter. For example, the ... button for the color parameter to the Color module lists red, green, and blue. |
Name | Specifies the name of an output parameter. You cannot modify this field. |
Type | Specifies the type of an output parameter. You cannot modify this field. |
Destination | Displays the name of the tool (or tools) to which the output tabs are connected. |
Cache | Specifies the number of results for this output of the tool that are eligible for caching. Cache can be "All Results", in which all results are eligible for cache, "Last Result", in which only the last value of the output is eligible, or "No Results", in which no results from the module should be cached. (See "Cache Control: Executive".) |
The seven buttons at the bottom of the Configuration dialog box are labeled boxes that perform an action when you click on them. The buttons are:
OK | Applies new values and closes the box. |
Apply | Saves newly entered values. Once you click on the Apply button, you can no longer restore previous values. |
Expand | Causes all hidden inputs to be displayed in the Configuration dialog box. You can then unhide hidden tabs using the Hide toggle button. |
Collapse | Causes all hidden input tabs to be removed from display in the Configuration dialog box. |
Description | Displays a window with descriptions of the input and output parameters of the tool. |
Restore | Restores previous values that were present when you opened the box or when you last clicked on the Apply button. |
Cancel | Restores previous values that were present when you opened the box or when you last clicked on the Apply button, and then closes the box. |
Most of the tools have more input tabs than are displayed when a tool icon is initially displayed. For example, the Isosurface module has six inputs, but when an Isosurface tool icon is initially placed on the canvas, only three input tabs are displayed. The displayed tabs represent those that are most frequently used.
To reveal the hidden input tabs:
Once the input tabs have been revealed, they can be hidden.
To hide input tabs:
Hiding input tabs in this way will cause all tabs that are not connected to another module to be hidden.
If you wish to hide or reveal individual inputs, use the hide toggle button in the Configuration dialog box (see "Inputs Section").
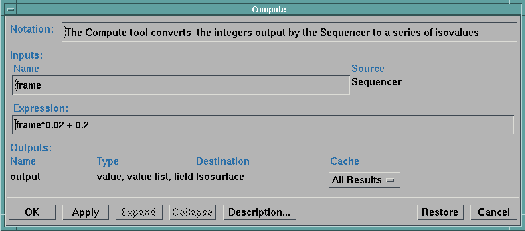
The Configuration dialog box for the Compute module, illustrated in Figure 51, differs in some respects from the other Configuration dialog boxes. It consists of:
Notation | See "Notation Field" for information. |
Name | These fields allow you to enter names for the parameters of the expression. By default, the names are labeled a and b, but you can change them to a name more relevant to the particular computation. (You can have fewer or more than two inputs to the Compute module; see "Adding and Removing Input and Output Tabs".) |
Source | See information on Source fields. |
Expression | The expression is entered in this field. See Compute in IBM Visualization Data Explorer User's Reference for more information. |
Figure 51. Typical
Dialog Box for the Compute Module
The Find Tool... dialog box provides you with an easy way to locate tools on the VPE canvas. You may find this dialog box especially useful if you are editing a large visual program. The dialog box can also be used to locate transmitters and receivers by the names you give them. You open this dialog box by selecting the Find Tool... option from the Edit pull-down menu.
Figure 52. Find
Tool Dialog Box
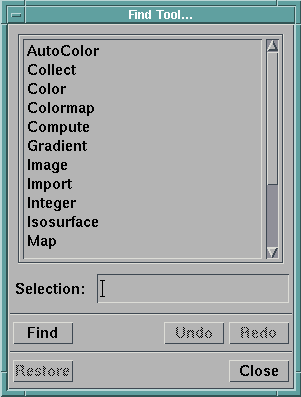
Figure 52 illustrates the layout of the Find Tool dialog box. The dialog consists of three parts:
Tool list | Displays an alphabetized list of all the tools in the visual program currently displayed on the VPE canvas. If the visual program contains transmitters, receivers, probes or picks, then the tool name (e.g., Transmitter) is displayed instead of the user-supplied name. |
Selection | Displays the current tool to be located. When the dialog first appears, this field is blank. To change the selected tool either click on the desired tool name, or click on the Undo or Redo buttons, or type the name of the tool, transmitter or receiver directly in the selection text field. The next time you open the dialog box, the selection field will display the last selection you made. |
Pushbuttons | Find initiates the search for the selected tool. Undo undoes the last find and updates Selection. Redo redoes an undone find and updates Selection. Restore restores the canvas to the location at the time the dialog box was opened. Close closes the dialog box. |
To locate a particular tool on the canvas:
| Note: | The located tool icon is selected. |
If you wish to find another occurrence of the same tool, simply click on Find again. This can be repeated as many time as you desire. When no more occurrences of the tool can be found, a message is displayed. If you click on the Find button again, the search will be reset and the first occurrence of the tool icon will be located.
If the selected tool is a transmitter, receiver, probe, or pick, occurrences of the tool will be found independently of the user-supplied name. To locate a transmitter, receiver, probe, or pick tool by name:
You can initiate the search for a different tool at any point. If you wish to retrace your steps, the Find dialog provides an Undo button, allowing you to undo up to 10 previous searches. When you click on the Undo pushbutton, the name of the tool (or transmitter or receiver) that was previously located will appear in the Selection: text field and the canvas is updated to reflect the location of the tool icon.
The dialog box also provides a Redo button. This enables you to repeat a search that was undone with the Undo button.
If you wish to return the canvas to its former "state" (i.e., to the set of tool icons it displayed) prior to the first search, click on Restore button.
| Note: | Clicking on Undo, Redo, or Restore will deselect the tool that is selected in the Tools palette. |
Under the Options menu bar category are selections for customizing the window:
Tool Palettes | Use as a toggle by clicking to close the palettes and make the working area on the canvas larger. |
Grid... | A dialog box, illustrated in Figure 53, appears for you to enter new values. |
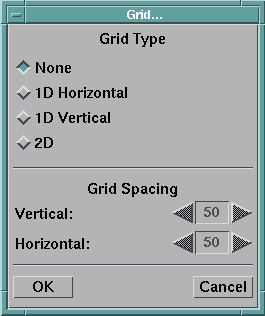
The Grid... option allows you to specify whether the tools you place on the canvas automatically align on a grid pattern. You can enable the grid pattern by clicking on one of the following:
1D Horizontal
1D Vertical
2D
The default is none.
You can control the spacing of the grid pattern by changing the number of vertical and horizontal pixels. Specify how the tools are to be aligned on the grid by changing the alignment toggle buttons. For example, the dialog box in Figure 53 specifies grid spacing of 50 pixels, with the center of a tool being placed at a grid position.
For your own documentation purposes, you can add comments to your visual program. These comments are saved and restored as you save and restore the program.
To add a comment to the visual program:
You can view these comments by using the Comment...
option of the Edit pull-down menu in the VPE,
or by using the Application Comment
option of the Help pull-down
menu in any primary window.
You can also add annotation directly to the canvas.
Select the Add Annotation option from the Edit
pull-down
menu. A cursor appears. Click on the canvas where you would like to place
annotation. You can modify the text in the annotation by double-clicking
on the annotation. A text-entry dialog appears.
By default, the annotation text is visible on the canvas. You can choose
the Hide Text option on the text-entry dialog, in
which case only a "marker" appears on the canvas.
You can structure your visual program to make it more readable by
using pages. A visual program can consist of a number of pages. Each
page contains a set of modules completely disconnected from modules on
other pages. Receivers and transmitters are used to connect modules on
different pages.
To use pages, select the Pages... option in
the Edit menu of the VPE.
A cascade
menu allows you to create an empty page, create a page containing the
currently
selected tools, delete the currently displayed page, or configure the page,
that is, change its name or position.
Adding Annotation to a
Visual Program
Creating pages in the
VPE
The Save As... and Open... options of the File pull-down menu use similar dialog boxes. A sample Save As... dialog box is illustrated in Figure 54.
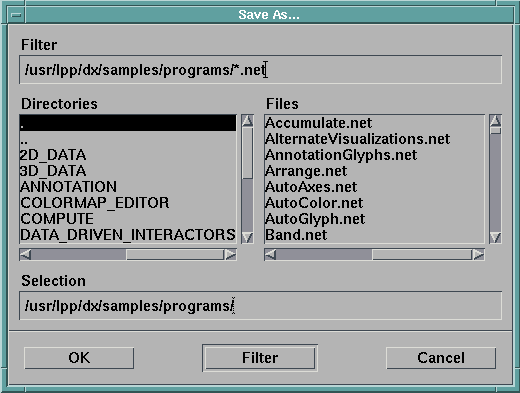
Filter | Specifies the current search argument for files. You can broaden or narrow the scope of the files displayed in the Files area by changing the filter string. You can also use the filter to specify a directory in which to search for the files. For example, a filter of /abc/*.net displays all of the visual programs in the abc directory. Change the filter string by clicking on it and typing the new string. Because Data Explorer appends the .net extension to visual programs when it saves them, be sure to specify .net at the end of the filter string. To request smaller groups of files in the current directory:
|
Directories | Displays the directories in the current filter path. When you click on a directory, its name is displayed in the filter field; pressing the Enter key then applies that filter. You can traverse through the available paths by double-clicking on the paths displayed in this portion of the dialog box. The parent directory of the filter path can be reached by selecting and applying the directory name that ends with two periods (..) as a filter. As you change directories this way, the Selection box and Files section are updated accordingly. |
Files | Displays the files specified by the File Filter and the directory shown in the Selection area. Clicking on a file name once will change the current selection. Double-clicking on a file name will select that file and proceed with the Open, Save As, or Load Macro operation. |
Selection | Displays the current file selection. When the dialog box first appears, Selection displays the current directory. To change the current selection, either click on the desired file in the File area or click on the Selection area and type the desired file name. The next time you open the dialog box, the Selection field displays the directory you most recently specified. |
Pushbuttons | OK approves the file name in the Selection area and proceeds with the Open, Save As, or Load Macro operation. Filter applies the filter string specified in the File Filter area. Cancel closes the dialog box. In the Open... and Load Macro... file selection dialog boxes, the Comments button lets you view any comments associated with the selected visual program file. |
You can use the scroll bars provided on the right side and the bottom of the directories and file listings to view file and path names that are either too long or too numerous to fit in the available space.
When saving a visual program, Data Explorer saves the following files:
An existing file can be saved in the following ways:
To save a program that has been named and saved previously, press Ctrl+S or select the File menu Save option. This replaces the previous version of the file. A named visual program has its name displayed in the title bar of the VPE window.
To save program as a new file:
The file is saved and the Save As... dialog box disappears.
To restore a previously created visual program, select the File menu Open option.
The Open dialog box appears (Figure 55).

It lists all file names in the current directory that are found through the specified file filter. A file can be selected in one of the following ways:
Note that a complete file name must be specified in the Selection field to read in a file. A file name may be highlighted under the Files heading without appearing in the Selection field. To select the file, click on its name under the Files heading.
To see any comments that might be associated with a visual program before you load it, select a file by clicking on its name once or by entering its name in the Selection text box, then click on the Comments button. If the visual program has comments associated with it, they are displayed; otherwise, a message appears telling you that there are no comments.
To see a different list of files, change either the file filter or the file directory ("File Selection Dialog Boxes").
When you open a file, its name is displayed in the title bar of the VPE.
[Data Explorer Home Page | Contact Data Explorer | Same document on Data Explorer Home Page ]