Data Explorer provides you with the capability to distribute your visual program across a network of heterogeneous workstations. Distributing your visual program provides you with parallelism and enhanced resource utilization. Parallelism is achieved by the simultaneous execution of different portions of the visual program on each of the workstations. The amount of parallelism that you can achieve is dependent on the organization of your visual program and the number of available workstations.
Enhanced resource utilization can be achieved, for example, by assigning computationally intensive portions of the visual program to the more powerful workstations. If the data you are visualizing is located on one or more workstations, then performing some of the data realization and transformation on the workstations containing the data can reduce data transfer overheads.
Distributed processing in Data Explorer is achieved in two ways: by using "outboard" modules (user supplied) or by placing groups of tools to "execution groups". These two methods can be used independently or in combination. For a discussion of outboard modules see 11.3 , "Inboard, Outboard, and Runtime-loadable Modules" in IBM Visualization Data Explorer Programmer's Reference. Execution groups can be created and modified using the Visual Program Editor or by using attributes if you are using the Data Explorer scripting language (see Chapter 10. "Data Explorer Scripting Language"). Once the execution groups are created, you assign each group to the workstations over which you wish to distribute the visual program. You can assign more than one group per workstation. Note that if more than one group is assigned to a given workstation, the groups will not be run as separate processes.
Data Explorer uses this two part approach of creating groups and assigning groups to make it easier for you to change the set of workstations over which you distribute your visual programs. This utility is especially convenient if you share visual programs with other users.
When you execute a visual program for the first time, the Data Explorer executive is started on each workstation over which the program is to be distributed. Each executive "plans" the execution and executes each of the execution groups assigned to it. This means that not only is the computation and data flow distributed, but the control flow is distributed as well. One of the workstations is a "master"--the workstation to which the user interface is connected. The master creates and initiates the communication between the other workstations and distributes commands from the user interface to all the workstations. The master also executes any execution group that is not assigned to another workstation in addition to its own assigned groups.
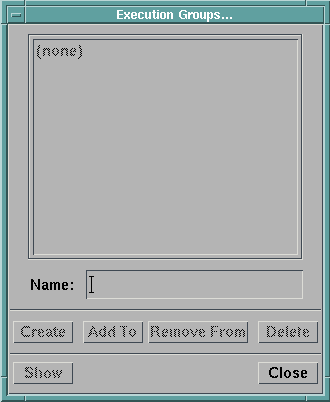
By default, all tools in a visual program belong to a single unnamed execution group. This group is executed on the master workstation. New execution groups are created and existing execution groups are modified and deleted using the Execution Group dialog box (Figure 79).
The dialog box consist of three parts:
Groups | Displays the current set of execution groups. A group name can be selected by clicking on the name. It can be deselected by clicking on the name a second time or by clicking on another name. |
Name | A text field for specifying the name of a new execution group, the name of an execution group to modify or the name of an execution group to be displayed. If an execution group is selected, the name of the group is displayed in the Group Name text field. |
Pushbuttons | Create causes a new execution group to be created. Add To causes a set of selected tools to be added to an existing execution group. Remove From causes a set of selected tools to be removed from an execution group. Delete causes an existing execution group to be deleted (the tools in the group are not deleted from the VPE canvas). Show causes all the tools on the canvas that are members of the selected group to be selected. Close causes the dialog box to be closed. |
Figure 79. Execution Group
Dialog Box

To create an execution group
The newly created execution group will appear in the list of execution groups.
| Note: | If a tool is a member of an existing execution group and it is placed into a new group, the tool is automatically deleted from the existing group. A single tool can not be a member of two execution groups. |
Execution groups can be modified by adding new tools to the group or removing tools from the group.
To add tools to an Execution Group:
To remove tools from an Execution Group:
To delete an execution group:
Data Explorer provides you with the ability to display all the tools that are members of an execution group. To display the tools:
The tools that are members of the execution group become selected. If the selected tools are not part of the currently displayed portion of the visual program, the VPE will be updated so that the selected tools will be displayed.
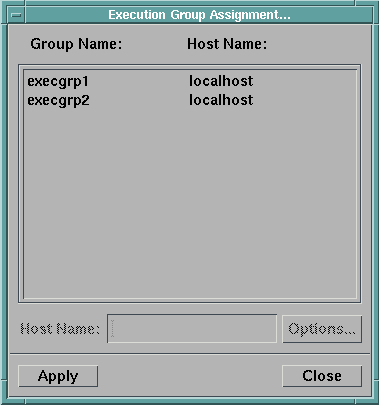
Once you have decomposed your visual program into execution groups, you can assign these groups to workstations (or hosts). If you do not specify a host for a particular execution group, the group will be executed on the master. Execution groups are assigned to a host using the Execution Group Assignment... dialog box (Figure 80).
The dialog box consists of three parts:
Groups and Hosts | Displays the name of an execution group and the host on which the group is executed. If a host name is not given, then "localhost" is displayed as the host name. |
Host Name | A text field for specifying the name of a host on which an execution group is to be executed. |
Pushbuttons | OK causes the assignments of executions groups to host names and closes the dialog box. Options... opens a dialog box that allows you to specify startup options (e.g., memory size, or the Data Explorer executive that will be started on the host. |
Figure 80. Execution Group
Assignment Dialog Box

To assign an execution group to a workstation:
In general, you can place any tool in any execution group, alter the members of an execution group at any time, or change the assignment of an execution group from one host to another at any time. The exceptions to these rules deal with:
Modules that maintain internal state information using private cache objects cannot be freely moved between hosts. Doing so will cause the module to lose its state information or obtain old state information. If you do reassign a module maintaining state to another host, you should reset the server using the Connection menu Reset Server option to ensure correct execution. The only Data Explorer module provided with the system that maintains state information is Streakline.
When you are using the hardware rendering option with either the Display or Image tools, the tool should be assigned to execution on the host physically connected to your display.
The Pick module must be run on the same host as the Image tool.
[Data Explorer Home Page | Contact Data Explorer | Same document on Data Explorer Home Page ]