Project 5 / Face Detection with a Sliding Window
For this project, the main goal was to be able to detect faces in a given window using the sliding window detector of Dalal-Triggs. This was mostly a four part process - computing Histogram of Gradients for training images of faces, computing HoG for training images of non-faces, training a linear classifier with these HoG features, and finally using a sliding window approach to search for faces in our test images.
Obtaining Histogram of Gradient Features
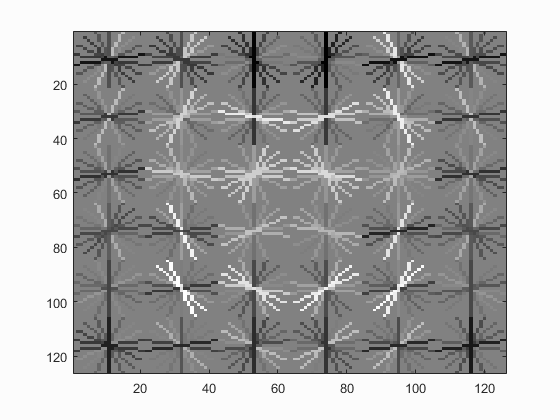
The first step was to properly describe the features of a face by using a template (36 by 36 pixels). In this case, a large number (roughly 6,700) cropped cutouts of faces were used as training data to identify the histogram of gradients of each. Histogram of Gradients is very similar to SIFT, where it groups the image into split sections, and determines the orientation of each of the pixels in that section. All of the positive features were combined into one row (the HoG resultant matrix was transformed into a vector and layered into rows - thus meaning there were roughly 6,700 rows of HoG features for faces). This resultant matrix could then be used to generate the final HoG for our face template, pictured later in the results. As you can see, the gradient orientations seem to vaguely represent a face.
For the positive features, a simple call to vlfeat's HoG function worked well. However, the negative features were not all cropped into the same size as our template, and there were only 275 non-face training images to work with. However, most of the images were much larger than our template. Thus, we were able to randomly sample the negative images for non-face templates of 36 by 36 pixels each. The non-face training images would be converted to grayscale since the face images were all grayscale as well. Then, a random image was selected. The image was then randomly resized between double its scale size to as small as it could get without being smaller than the size of the face template (36 by 36), and the Histogram of Features was computed for that scaled image. Finally, a template cutout of the image (36 by 36 square, so in HoG dimensions, default of 6 by 6 by 31) was selected at random and chosen to be one of our non-face training samples.Once 10,000 of these randomly sampled negative features were determined, the end result was once again a matrix where each row consisted of a sample's HoG features. The more randomly sampled negative features there were, the generally more accurate the results were up to an extent - of course, it would take much longer to describe all of the negative samples. A part of the code for randomly selecting negative samples from images is shown below.
% resize the image randomly, as long as its still larger than our template
random_resize = (2.0 - min_resize) * rand() + min_resize;
im = single(imresize(im, random_resize));

% obtain hog features for the resized image
hog = vl_hog(im, feature_params.hog_cell_size);
new_y = size(hog, 1);
new_x = size(hog, 2);
% randomize a chunk of the image of the template size to train as our negative feature
cell_size = feature_params.hog_cell_size;
start_x = ceil((new_x - cell_size - 1) * rand() + 1);
start_y = ceil((new_y - cell_size - 1) * rand() + 1);

% get the corresponding hog sedction and transform it into a vector
hog_section = hog(start_y:start_y+cell_size-1, start_x:start_x+cell_size-1, :);
hogArray = reshape(hog_section, 1, (feature_params.template_size / feature_params.hog_cell_size)^2 * 31);
Classifier Training
The next step was to train a linear classifier to determine if a given template would be classified as a face or a non-face. This was simply done by supplying our two previously computed resultant matrices of positive features (face HoG features) and negative features (non-face HoG features) into vlfeat's linear svm training function, where it would return a weight vector and offset vector to be used in testing (as done in the previous project, Project 4).
Face Detection
Now that a way to determine whether or not a template (36 by 36 pixel square) is a face, we just need to be able to supply these properly sized templates from test images. However, simply going through a test image and stepping through all possible chunks of the template size is not accurate enough due to scale. Some faces in an image may be much larger than the template - perhaps on the magnitude of 350 by 350 pixels, or even larger. Thus, the face detector involved two main steps. The first step was resizing the image to a proper scale. In this case, the image would start at its original size, and would get rescaled down by 0.9 with each iteration until the image is smaller than the face template. In each of these resized images, a histogram of features would be determined for the entire resized image. The detector would then run a sliding window of the template size (resized accordingly to match the dimensions of the resulting Histograms of Features matrix) around the HoG features with some step size. Note that the template size is not affected by the image scale - the template size remains the same regardless of the scale of the image. Thus, the detector is able to account for multiple scales. The step size is how many pixels to skip after a area of the template size had been checked. For the best but slow results, a step size of one would be used. For each template sampled from the test image, the HoG features would be evaluated by the weights and offset as learned by the linear SVM, and would be given a confidence. A higher, more positive confidence means that the classifier believes the cut-out area is a face, while a negative score means that the classifier believes the cut-out area is not a face. In short, the image is taken and resized into various sizes to account for scale. For each of those resulting resized images, the detector runs a sliding window across the image, looking and checking for any chunk of the same size as our original face template (converted into HoG dimensions) that is likely to be a face. Of course, since we were dealing with HoG converted dimensions, the resulting coordinates of the image had to be converted back into the original image coordinates, so that we can see where the detected faces actually are in the images. The below shows the code for running the sliding window on some given image (that may have been resized).
        % inner hog step size loop
        for j=0:y_max/step - 1
            for k=0:x_max/step - 1
                y_start = j * step + 1;
                x_start = k * step + 1;
                sz = feature_params.hog_cell_size;
                hog_section = hog(y_start:y_start+sz-1, x_start:x_start+sz-1, :);
                hogArray = reshape(hog_section, 1, (feature_params.template_size / feature_params.hog_cell_size)^2 * 31);
                confidence = hogArray * w + b;

                % confidence cutoff - only if the confidence is greater than 0, do we add it to our faces.
                if confidence > 0.0
                   cur_bboxes = [cur_bboxes; x_start*sz/resize y_start*sz/resize (x_start+sz-1)*sz/resize (y_start+sz-1)*sz/resize];
                   cur_confidences = [cur_confidences; confidence];
                   cur_image_ids = [cur_image_ids; {test_scenes(i).name}];
                end
            end
        end
Finally, non-maximum suppression was added to the resulting image, as because of our low step size and various resizing of the image, there may be a lot of overlap with the faces. Thus, in all the overlap, only the chunk with the highest confidence of being a face is kept, while the others are thrown out.
Results on Testing Images
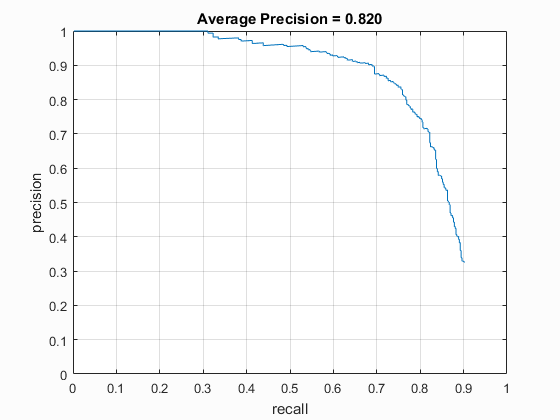
Below are the results for the face detector on some of the test images. The parameters used here were lambda of 0.01 (for linear SVM), a step size of 1 in the face detector, a resize scale of 0.9, and 20,000 randomly sampled negative features. Since these images come with ground truth, the confidence cutoff was chosen to be 0.0.
Face template HoG visualization. As can be seen, the visualization vaguely represents a face.
Precision recall for the detection.
Example of detection on the test set from the starter code.
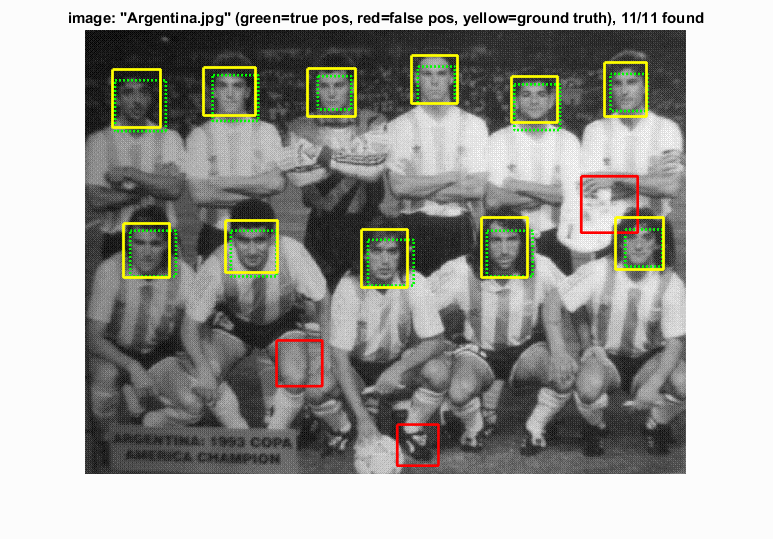
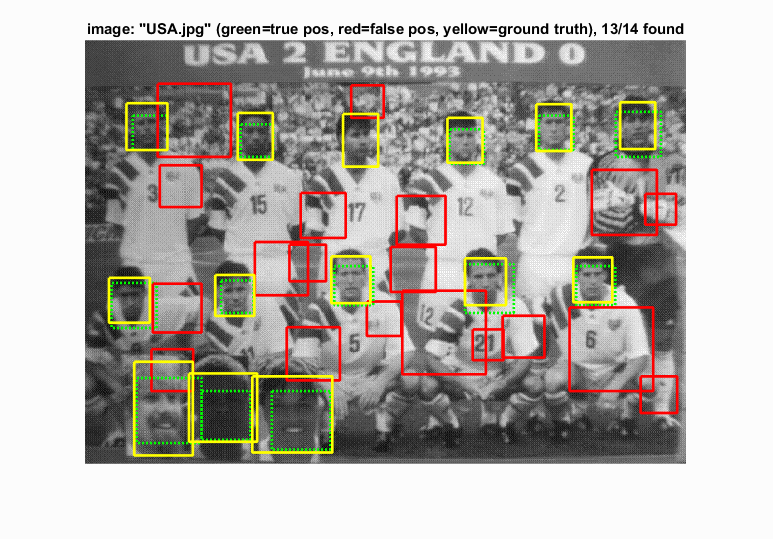
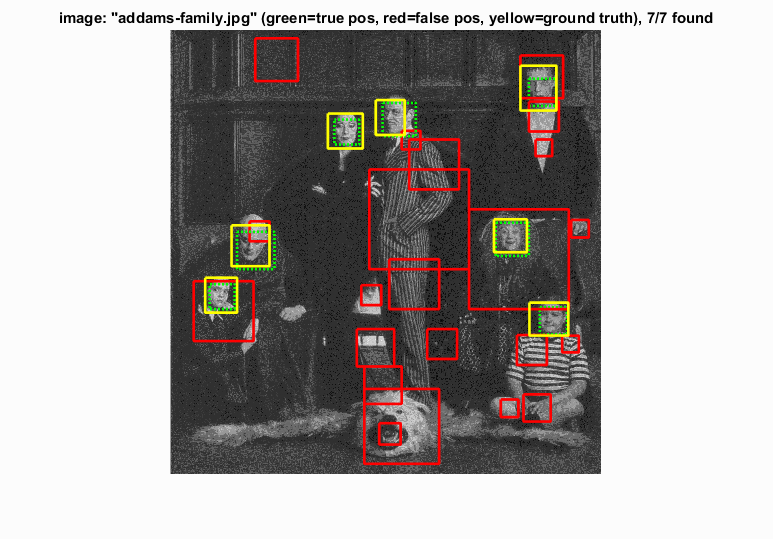
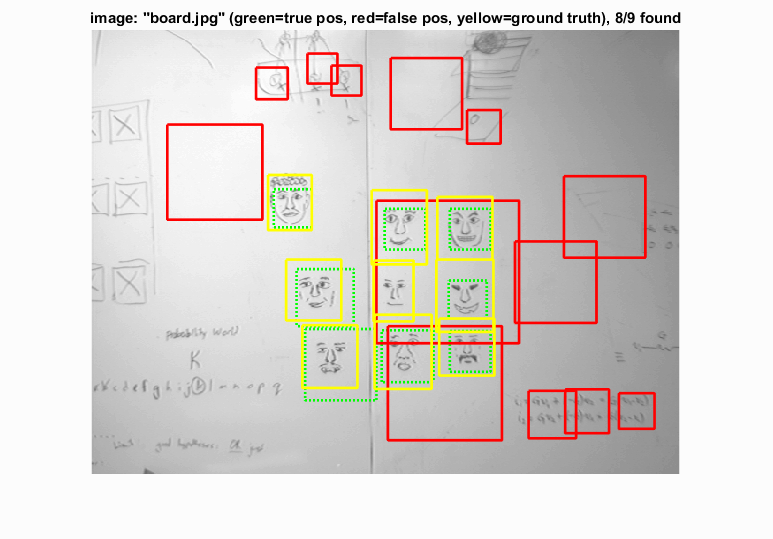
As can be seen above, the detector is generally able to detect most faces present in a picture. Some images also come with several inaccurate detections, but since most of these detections have a lower confidence than the actual faces, the actual precision value is still fairly high in comparison. As can also be noticed by the last image, hand-drawn faces are also detectable - even though the algoirthm detects a lot of other stray writing as faces as well.
Results on Other Images
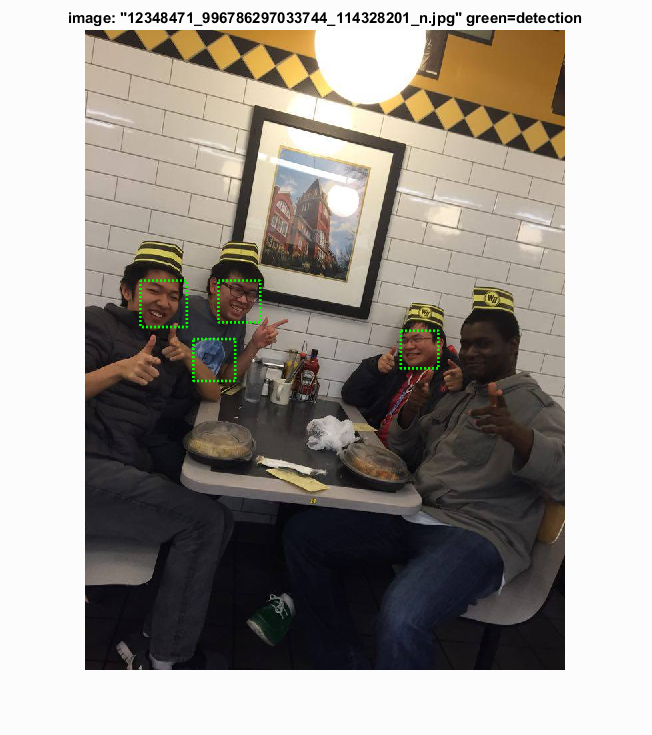
Below are the results for the face detector on some other images that I took and played around with. This includes some of the class photos from CS4476. The parameters used here were the same as the previous section, meaning a lambda of 0.01 (for linear SVM), a step size of 1 in the face detector, a resize scale of 0.9, and 20,000 randomly sampled negative features. Since these photos did not have ground truth, the confidence cutoff was chosen to be 1.0, so only the most confidence detections would be seen. Also, because so many of these extra images were extremely large images to begin with, the calculations took too long to be feasible at their original size. Thus, the images were first resized to be under 2000x2000 pixels.
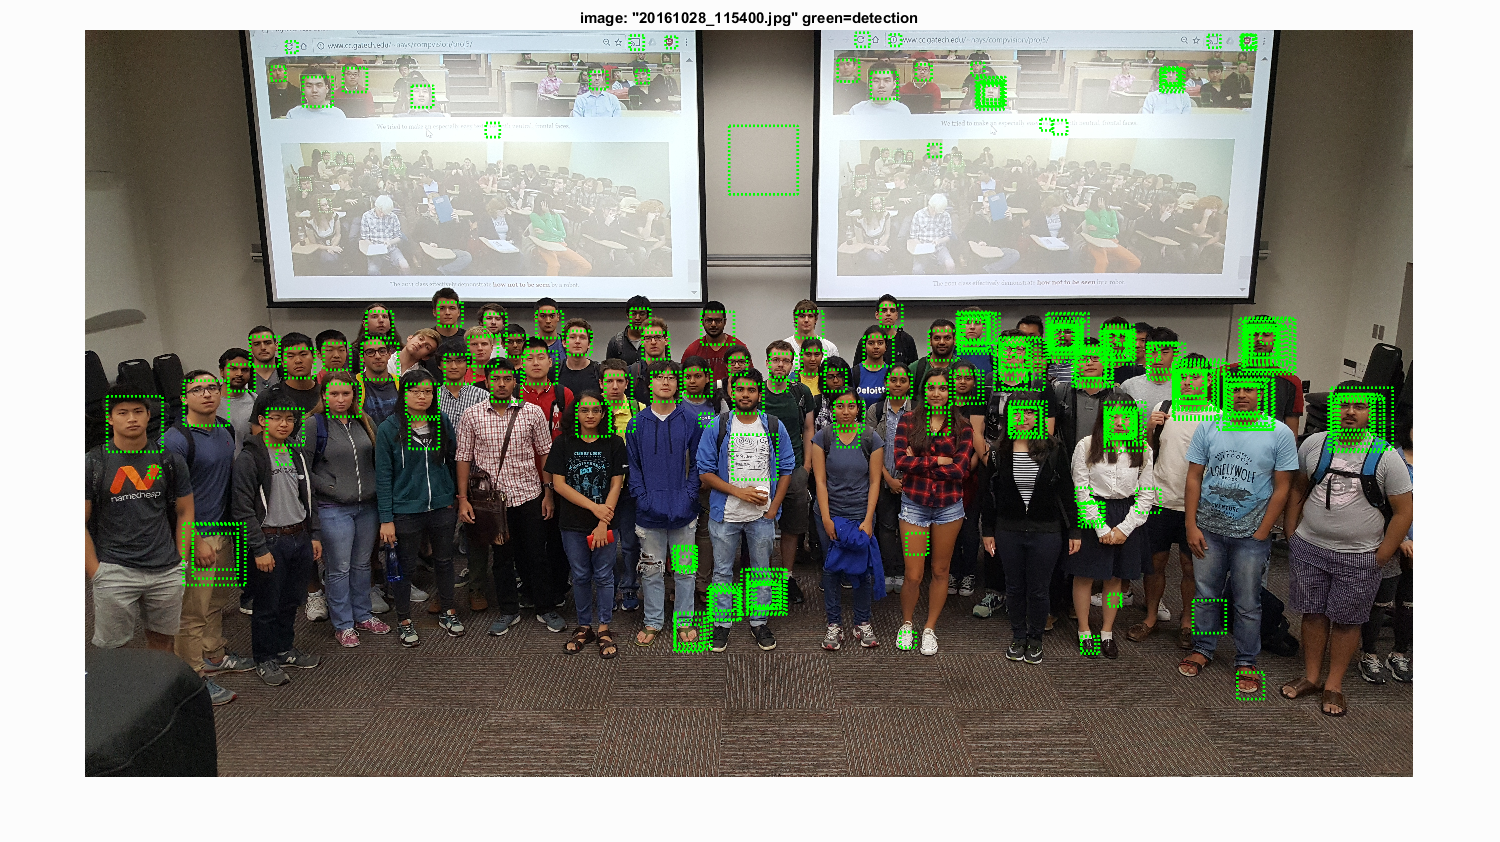
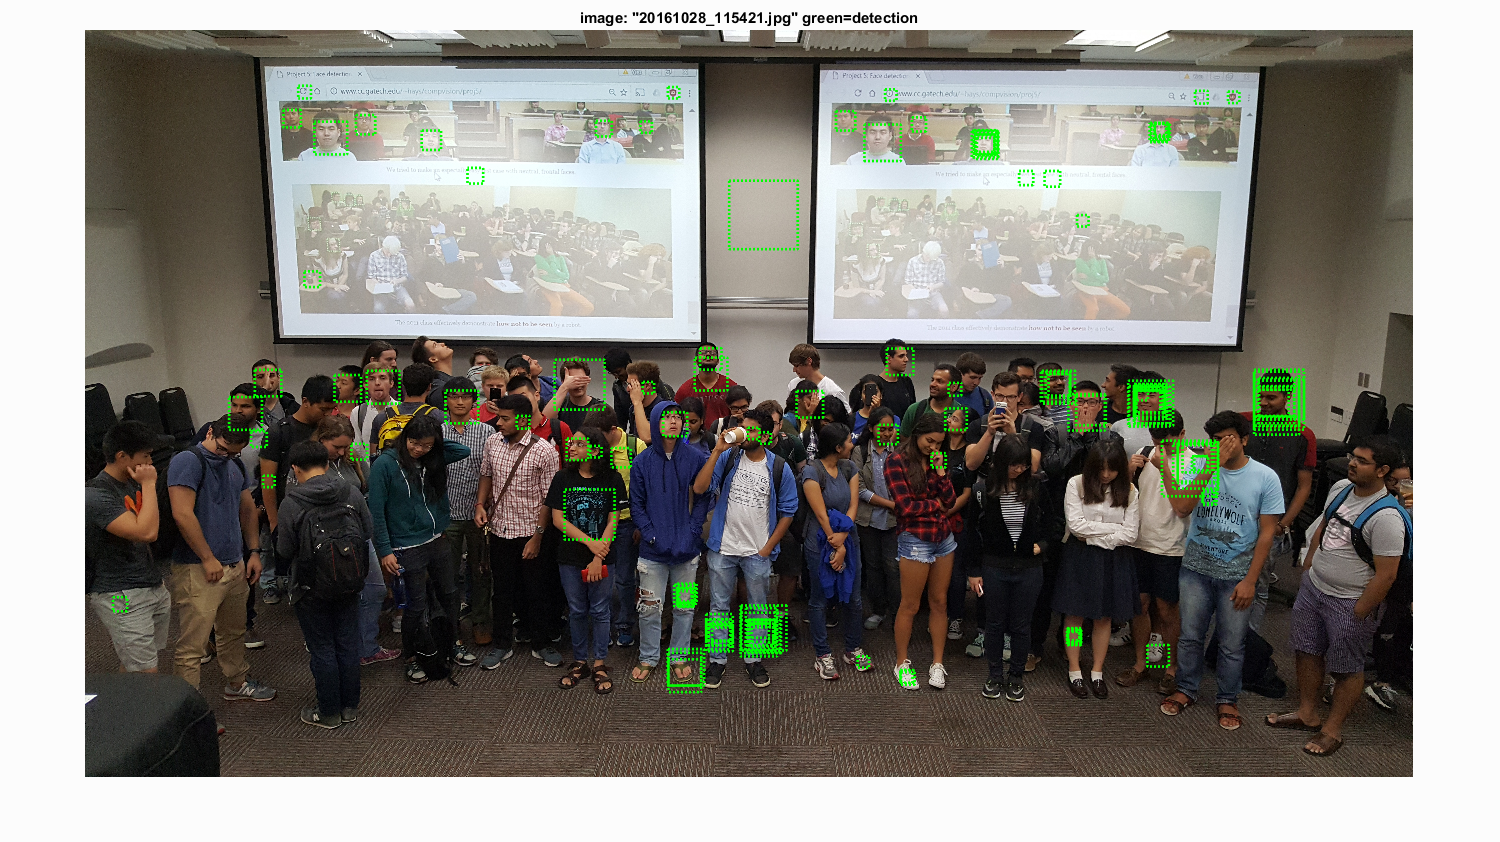
These were class pictures taken in CS4476, with the top one being easier to identify faces (neutral faces), while the bottom had harder to detect faces (such as face turned, lowered, or occluded). The top image shows some places were non-maximal suppresion failed to work, but that may be because the image was too large (since the other test images did not have this problem). Overall, if the faces are neutral, most were easily detected - including even some in the background projector.

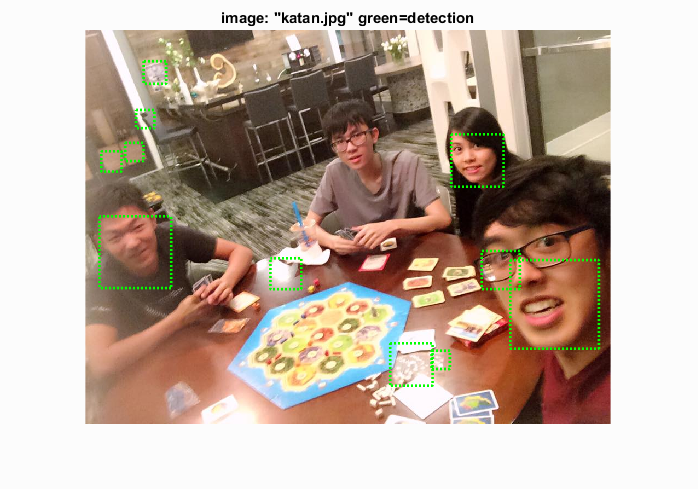
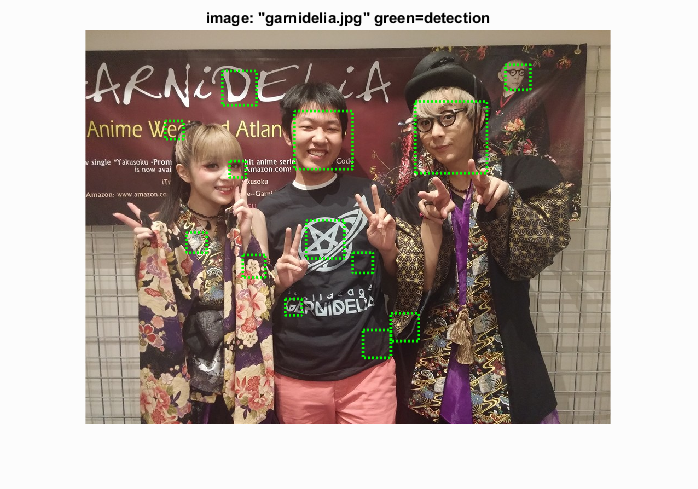
These were some images that I had on my phone. In order to maximize the amount of accurate faces shown, I lowered the confidence threshold to 0.5 for these images. Most of the faces were able to be detected with quite a few noisy samples as well, but overall seems to be fairly effective. The detector also seemed to zoom in more on eyes rather than the entire face at times.
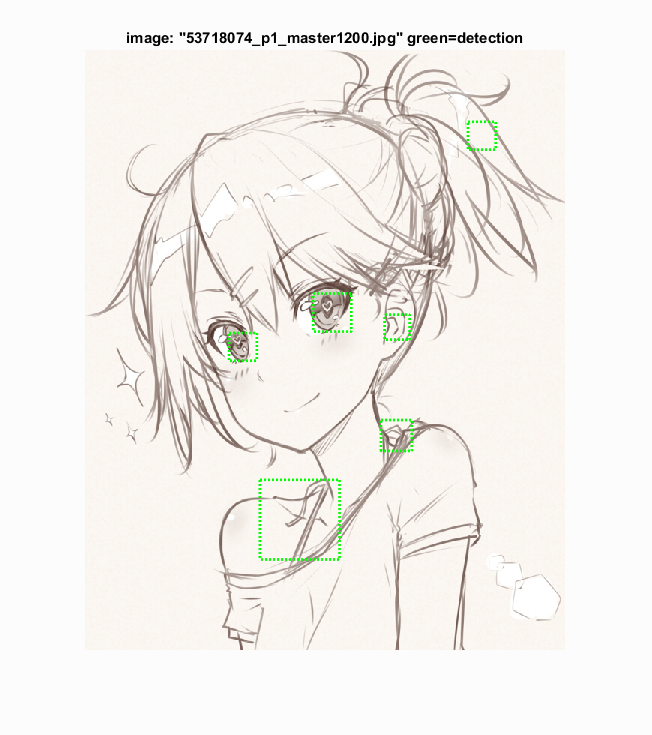
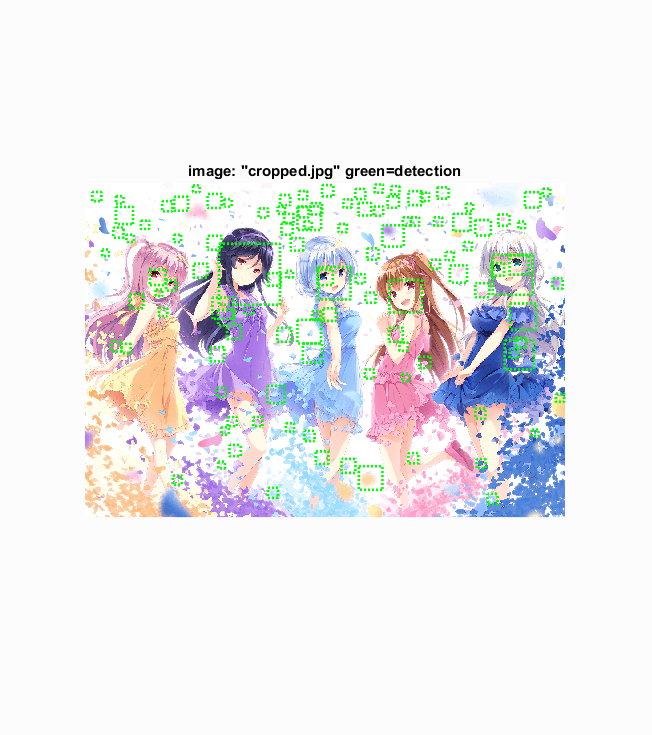
Just for fun, I tested on some drawings of anime art. For the most part, it seems like the detector goes for the eyes of these types of images rather than the full face, which is understandable since the overall proportions of the faces are completely different from what was trained upon.