IBM Visualization Data Explorer QuickStart Guide
[ Bottom of Page | Previous Page | Next
Page | Table of Contents | Partial Table of Contents | Index ]
Once you have created a Data Prompter header file, the next step is to use that
file to import the data it describes.
The basic procedure follows:
- Place an Import tool icon on the VPE canvas
(see "Selecting tools and placing icons").
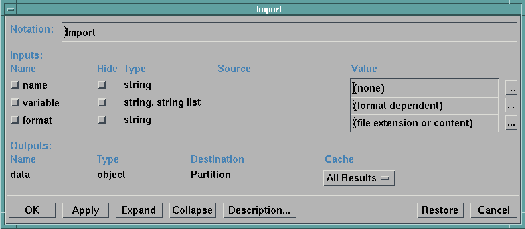
- Double click on the icon to invoke the configuration dialog box
(see Figure 19).
- The following information is required:
- The (path) name of the header file to be
imported (in the first text field of the
Value column
(at right).
If the Import module is part of a network displayed in the
VPE, the path name appears automatically.
- Set format (the third field of the column)
- Set format (the third field of the column)
to "general" unless the header file already has that
as its extension.
Figure 19. Import
Configuration Dialog Box.
Notes:
- Header files created with the Data Prompter are given this extension
automatically when they are saved with Save As...
(Step 10 of Example 1 in To save the header
file).
- The variable parameter can be used to import a
subset of the variables specified by the field
keyword statement.
For the General Array format, by default, all variables are imported.
The specified data file will now be imported when any visualization
program containing this Import module is run.
[ Top of Page | Previous Page | Next
Page | Table of Contents | Partial Table of Contents | Index ]
[Data Explorer Documentation | QuickStart Guide | User's Guide | User's Reference | Programmer's Reference | Installation and Configuration
Guide ]
[Data Explorer Home
Page | Contact Data
Explorer | Same document on
Data Explorer Home Page ]
[IBM Home Page | Order | Search | Contact IBM | Legal ]