
The Data Explorer user interface is built on the X Window System and Motif standards. These tools manage the windows used with Data Explorer. The windows you use depends upon how you choose to use the system.
The primary windows are listed and described at the start of this chapter. The primary window in which you begin a Data Explorer session (either the Visual Program Editor or Image window) is called the anchor window. (You can also have a menu bar as your anchor window by specifying -menubar on the command line.) This is the window that, if closed, ends the Data Explorer session. The anchor window is identified by a symbol resembling a ship's anchor located in the top left corner, as illustrated in Figure 30.
Descriptions of the primary window pull-down menu options are located in Section 8.1 , "Using the Primary Window Pull-Down Menus and Options".
Secondary windows, such as dialog boxes or informational boxes, appear when they are needed to complete a task. You can move secondary windows, but you cannot put them behind the primary window from which they came. See IBM AIXwindows User's Guide or the appropriate window system overview for more information on how to manipulate windows.
In this chapter, when references are made to the X Window System it means any window server that supports X11 protocol, including Sun's OpenWindows. The Motif window manger, mwm, has been used in many figures and examples in this chapter. Please use the appropriate window manager for your system, such as vuewm for Hewlett-Packard, 4dwm for SGI, and olwm for Sun. Since title bars and window borders are features of a window manager, the appearance of your windows may differ slightly from those in the figures and examples.
Figure 30. Visual Program
Editor Window
The following are features of Data Explorer windows:
In Data Explorer, the mouse is one of the primary input devices. Some operations can be done using the keyboard, but many rely on the mouse. The mouse-related terms used in this guide are:
Click | One press and release of a mouse button |
Double-click | Two rapid presses and releases (clicks) of a mouse button |
Triple-click | Three rapid presses and releases (clicks) of a mouse button |
Drag | A press and hold on a mouse button. For example, with the button depressed, a selected item can be moved ("dragged") to another part of the screen by moving the mouse pointer to the desired location and releasing the mouse button. |
Shift-Click | A press and release of the mouse button while depressing the Shift key. |
Shift-Drag | A drag of the mouse pointer while depressing the Shift key. |
Most of the Data Explorer operations use the left mouse button. The exceptions are the Online Help function and the image direct interactors, which use two or three mouse buttons.
You can move windows and adjust their sizes on the screen.
To move a window, drag the window name portion of the title bar to the desired screen location.
To resize a window, do one of the following:
To use the mouse to see the list of options a pull-down menu offers, select the pull-down menu's title from the menu bar by moving the cursor to the appropriate title and clicking on it. The menu is displayed. To then select an option from the window, move the cursor to the desired option and click on the option.
Alternatively, select an option with the mouse by moving the cursor to the desired menu title and pressing and holding the mouse button. The pull-down menu appears. Then move the cursor to the desired option and release. Each option is highlighted as you move the cursor across it.
To select a pull-down menu with your keyboard, press the Alt key in conjunction with the underlined letter of the pull-down menu name (usually the first letter). For example, if you want to open the File menu (whose title appears in the window as File), press Alt+F.
Once the pull-down menu is displayed, you can select an option by pressing the key corresponding to the underlined letter of the desired option, or by directing the highlighted bar with the keyboard's up and down arrow keys. When the desired selection is highlighted, press the Enter key.
Some of the pull-down menu options can be selected without accessing the pull-down menus, using accelerator keys. Accelerator keys use the Ctrl key in combination with single keys to provide fast access to frequently used options. These keyboard options are displayed on the right side of the pull-down menu, across from the options that they access. Accelerator keys are effective only in the active window; that is, the mouse cursor must be in the window in which the desired pull-down option is located. To use an accelerator key to select a pull-down option, press the Ctrl key in conjunction with the appropriate letter. For example, the Save option in the File pull-down menu can be invoked by pressing the Ctrl key and the S key at the same time. A summary of the available accelerator keys and their functions is provided in Appendix G. "Accelerator Keys".
For information on each window's menu bar and pull-down options, refer to:
In the Visual Program Editor (VPE) and Control Panel windows, you use the mouse to select various items, such as items in a list, tool names, tool icons, and interactors. To select any of these items, simply click on the item.
In general, you can deselect an item by clicking on it again. The exceptions are the tool icons and interactors, for which you must either click on another part of the canvas, or shift-click on the item.
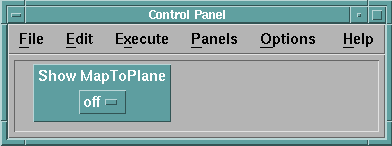
An option box contains a list of choices, but usually displays only the one currently selected. Option boxes are used throughout the Data Explorer interface. For example, the Selector interactor, illustrated in Figure 31, can be displayed as an option box.
Selecting a choice from this box is similar to selecting options from pull-down menus. To display the possible choices, click on the tab on the right side of the option box. With the list of choices displayed, click on your desired selection. The list of options disappears, and the option box is updated with the new selection.
Figure 31. Example of an
Option Box
Alternatively, you can select an option with the mouse by moving the cursor to the desired option box and pressing and holding the mouse button. The list of options appears. Then move the cursor to the desired option and release. Each option is highlighted as you move the cursor across it.
Some of the options are accessible using accelerator keys. This is indicated to the right of the option in the options list, much like it is in the pull-down menus.
Many of the dialog boxes in Data Explorer include text fields that you can change. You can place a text cursor in the box by clicking on the box. With the cursor in the box, you can use the keyboard to alter the text. The number of times you click on the text box depends on how you want to edit it:
Single Click | Places the text cursor at the point on which you clicked in the existing text field. All text you type is then inserted in the field, after the selected point. You can also use the Delete and Backspace keys. |
Double Click | Places the text cursor at the start of the word on which you clicked in the existing text field, and highlights that word. When you type, the highlighted text is replaced with the new text you enter. Pressing the Backspace key deletes the highlighted text. |
Triple Click | Highlights the entire text field. When you type, the entire field is replaced with the new text you enter. |
Drag | Highlights the portion of the text field that you drag the cursor over. When the mouse button is released, the text remains highlighted. Typing anything replaces the highlighted text with what you type; pressing the Backspace key deletes the highlighted text. |
Data Explorer allows you to copy and paste text within text fields. To copy text, select the desired text by double-clicking, triple-clicking, or dragging the cursor over it with the left mouse button. This action selects and copies the text. To paste the selected text in a text field, position the mouse cursor at the point you want to insert the text, and click on the center mouse button. The pasted text is inserted at the mouse cursor position.
If the amount of text entered into a text field cannot be fully displayed, you can use the keyboard to scroll the cursor through the text. Pressing the left or right arrow key moves the cursor one character to the left or right, respectively. Also, pressing the Control key (Ctrl) at the same time as either the left or right arrow key moves the cursor one word to the left or right, respectively. The Home key will move the cursor to the beginning of the text field. The End key will move the cursor to the end of the text field.
Your window manager allows you to:
These functions can be invoked using the menu, minimize, and maximize buttons on the title bar of Data Explorer windows. You can use the X Window System or the appropriate window system manager to customize the way these options work. For more information, see IBM AIXwindows User's Guide or another appropriate window system overview.
[Data Explorer Home Page | Contact Data Explorer | Same document on Data Explorer Home Page ]