Building Your First Java Program: Starting From Scratch
Welcome to CS 1331! If this is your first time using a corporate-grade
programming language, then you will probably find this tutorial
quite useful! The point of this guide is to familiarize you
with the basic workings of Java enough to allow you to install
and configure the Java Virtual Machine, set up any path settings,
and setup an Integrated Development Environment (IDE) to then
write the actual Java code. Hopefully, this will give you enough
knowledge and elbow room to experiment and learn more about
Java on your own. Good luck!

Installing and Configuring Java
We'll be using the Java Development Kit (JDK) version 11 from
AdoptOpenJDK this term. To help you get that set up on your machine,
we've prepared a handy short
installation guide flier.
Writing a Java Class
Alright! You're in the home stretch for setting up Java and
getting your first application off the ground. Bear with me
for just a little longer - you're already well beyond the hardest
parts (unless I screwed up somewhere and something isn't working
quite right, in which case you should contact your TA or instructor!).
To write your first program on either Windows or Mac, we recommend
that you get a text
editor such as Sublime
Text. (Prof. Stasko uses emacs, but then again, he's a
dinosaur.) Once you have it, just create a new file
called Test.java.
Now type these mysterious words into this text
window:
public class Test {
   public static void main(String [] args) {
     System.out.println("Hello!");
  }
}
|
My my, this sure looks mysterious! Let's see what this code
means, exactly. The first part:
public class Test {
This is a declaration. It is creating a class called "Test."
A class, in Java, is more accurately known as an Object. Think
about Object intuitively, as you would any actual tangible,
physical object that does...something. A car, for instance,
could be an Object. All Object have attributes, or the
specific aspects of the Object that make it what it is. For
a car, its attributes could be tires, seats, power locks, XM
radio, a turbocharged V6, a 6-disc changer...you get the idea.
Objects will also have member methods, or the functions
that cause the Object's attributes to interact together, or
even with other Objects, to accomplish certain tasks. For instance,
with the assistance of roads and signals, and utilizing its
power steering, tires, and engine, a car can "drive."
For this example, we're keeping it simple. This class, or
Object, will not do anything other than print out some sentences.
An important thing to note, first. Java is picky about syntax.
Whatever you name the .java file (the file in which you will
write your programs), that must also be the name of the class
itself (the word after "public class ____"), and it
is case-sensitive.
Now back to our original text window. You should have typed
in the original example, and now you should save it.
Now that you have the class name and file name matching correct,
let's continue with our analysis of this short block of code.
The next part:
public static void main(String [] args) {
Without going into too much detail about the meanings of
each individual word there, just know that every project
you write will need to have at least one of these in
it. When you run the project, this is what Java will look for
at the very beginning, and execution of your entire project
will start here. Next line:
System.out.println("Hello!");
Here, an Object is being used! It is an Object called "System.out,"
and we are using one of its member methods to do something.
In this case, the method is called "println" and it prints out
to your monitor whatever is written inside the quotation marks
that are inside the parenthesis.
Remember, Java is very picky about syntax, so every curly
brace you open, you must close. Every opening parenthesis must
be matched by a closing parenthesis. Also, you need semicolons
at the end of every line of execution code (as shown in the
example).
Now the moment of truth! Let's see if this sucker runs and
does what it should. Examine the next subsection of this document
below that describes how to compile and run your program.
Should everything behave properly, you should
eventually see everything inside the println( ) parenthesis print
out to your command window! Experiment and change what is inside
those parenthesis, recompile the file, and run it again.
Compiling and Running Java programs from the command prompt
It is important to know how to compile and run your code
from the command line, as this is how the TA's will be grading
all of your work. Before submitting your homework, it
is highly recommended that you verify that your code compiles
and runs from the command line.
Using Windows:
To open up a command prompt, go to the Windows search box
in the lower left of your computer's interface and start
typing command prompt. Choose the "command prompt"
program. A new window should pop up that is black and has
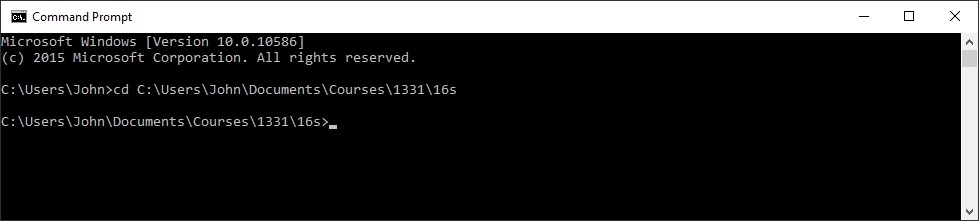
some gray depressing text on it. You will need to navigate to
the directory (folder) where you saved your .java files. To
do this, use the "cd" command, which stands for "change
directory". An example of doing this is shown below.
To compile the files, enter:
javac
JavaClassNameHere.java
Where "JavaClassNameHere" is
the name if your Java program. If you want to compile
all the files in the current directory, enter:
javac
*.java
To then run the compiled code,
enter:
java JavaClassNameHere
(for the example Test.java class specified above, the command
to run would be "java
Test")
Notice that you must specify the .java extension when you
compile, but not when you run the code.
Using a Mac:
The procedure for compiling and executing java code from
a command prompt is the same for all operating
systems, in that the syntax for using java and javac are identical
for Windows, Mac, and Unix (Linux) systems.
Refer to the "Compiling and running under windows"
subsection just above,
only use the "terminal" or "shell"
programs instead of the Windows command window to
access a command prompt.
Overview and Installation of IDEs
For students in CS 1331, especially those who are totally new to
Java, we recommend the jGRASP interactive development environment
(IDE). jGRASP is a tool that allows you to edit your java files,
compile them with one button click, and run them with a single
button click as well. It also includes basic debugger capabilities
so you can set breakpoints, step through your code, and inquire
about the values of variables at specific points of execution. The
system runs on both Windows and Mac machines.
We've found jGRASP particularly straightforward to acquire and use,
and thus recommend it to students who are new to Java and oop. In
general, we still recommend that you edit your programs in a
dedicated text editing tool like sublime, but you can compile, run,
and debug in jGRASP.
To use jGRASP, just download the system onto your machine, install
it, and then it should be ready to go. Use the left file browser
region to select a file to compile, then click the "Compile" button
to run the java compiler on it. Once it has no errors, you can click
on the "Run" button and the program's execution will show in the
subwindow beneath the source code.
Other IDEs such
as IntelliJ
and Eclipse are available too, and you can use them
in CS 1331 if you want. (We recommend avoiding Eclipse unless you
are already very familiar with working with an IDE. It is more of a
power tool.) No matter which IDE you use, you must make sure that
your HW programs to be turned in run fine on the command line. That
is how our TAs will be testing them. Sometimes IDEs can add code to
your files which will stop them from running correctly at the
command line when the IDE is not present. jGRASP does not do this at
all, another of the reasons we recommend it for our class.
Conclusion
Congratulations! You have successfully learned about, downloaded,
installed, and configured the Java Virtual Machine and software
development kit, as well as tied a fully-functional IDE in with
it to ultimately produce a working Java application! Not to
mention, you can now look like an erudite programming guru by
compiling and running your source files from the command prompt.
This tutorial was meant to give some insight into getting
an introductory Java course off the ground, especially to those
have had little or no previous programming experience. I have
almost always found the most difficult part of the course
not to be the homeworks or exams or quizzes, but rather
setting up everything that I need to complete all those assignments,
and unfortunately, it is this "setting up" information that
seems the hardest to come by. To those in the same boat as I,
this is for you. Remember that there are also countless other
useful IDEs out there aside from the ones mentioned here.
I hope you have found this introduction to be useful. As
you become more comfortable in the Java programming environment,
you will find most IDEs to be friendly in terms of their flexibility
with your goals for your programs. As a disclaimer, if you are
having ANY problems doing anything mentioned in this
tutorial, do not be hesitant to ask any of your TAs, professors,
or even fellow students for clarification, as getting all this
basic functionality to work is crucial to successfully
completing CS 1331. Even a week of dealing with dysfunctional
classpaths and sick Virtual Machines can set your integration
into CS 1331 back several weeks.
Good luck and good programming!
|